An SSD upgrade makes a laptop boot faster, load apps quicker, and feel far more responsive. The process usually includes checking drive compatibility, backing up files, replacing the old drive, and setting up the new one. Most laptops handle this upgrade without much trouble, though a few small details can cause delays. Here’s what to expect before, during, and after the swap.
What Are the Steps in a Laptop SSD Upgrade?
Before you touch a screw, start with safety and prep, because that simple step can save your laptop and your data. Power it down, unplug it, remove or disable the battery, and ground yourself. These safety precautions help you work with confidence, not worry. Next, gather your screwdriver, prying tool, backup software, and adapter in case you’re cloning files.
Then open the case, remove the panel screws, and gently lift the cover. Take a quick photo so you recall cable paths and screw spots. After that, disconnect the old SSD, remove its screw or clip, and slide it out carefully. Insert the new drive at the right angle, secure it, reconnect cables, and close the case. Finish with reassembly testing in BIOS and your operating system to confirm everything works.
How Do You Check Laptop SSD Compatibility?
Although upgrading a laptop SSD sounds simple, compatibility is the part you can’t afford to guess, because the wrong drive won’t fit, won’t connect, or mightn’t boot at all. Start with your laptop manual, service guide, or manufacturer support page. There, you’ll usually find approved storage options, capacity limits, and firmware notes.
Next, check your system information and BIOS version. Some laptops need updates for proper BIOS recognition, especially with newer, higher-capacity drives.
You should also confirm whether your laptop supports booting from the replacement SSD and whether there are brand-specific restrictions. Should you be unsure, compare your exact laptop model number with the drive maker’s compatibility tool. That extra minute helps you feel confident, avoid returns, and join the crowd of upgraders who got it right the first time around.
Which SSD Type Fits Your Laptop?
You need to match your laptop with the right SSD form factor initially, because a 2.5-inch SATA drive won’t fit where an M.2 card should go.
Then you must check interface compatibility, since your laptop might support SATA, NVMe, or only one of them.
Once you confirm both fit and interface, you’ll avoid costly mistakes and feel much more confident about the upgrade.
SSD Form Factors
In most laptops, the right SSD comes down to two things: the drive’s physical shape and the connector your motherboard uses. Once you check SSD dimensions, you’re really making sure the new drive will sit neatly in the space your laptop already provides. That fit matters.
Most laptops use either a slim 2.5-inch drive or a small M.2 stick. A 2.5-inch SSD looks like a compact rectangle and often slides into a drive bay.
An M.2 SSD is much thinner and mounts flat to the board. That’s where drive packaging helps. It tells you the size, length, and mounting style before you buy. Provided you match the form factor correctly, your upgrade feels straightforward, and you’ll feel more confident opening your laptop and joining the group of people who’ve done it too.
Interface Compatibility
Connectors are the real gatekeepers in an SSD upgrade, because a drive can look right and still fail to work once the interface doesn’t match your laptop. That’s why you need to check both shape and function before you buy. Your laptop can accept a 2.5-inch SATA drive or an M.2 drive, but connector standards still decide the fit.
Next, look at protocol differences. Some M.2 slots support SATA, some support NVMe, and some support only one. Should you choose the wrong type, your laptop simply won’t recognize it.
To stay on the safe side, check your service manual, current drive label, and BIOS storage details. You’re not overthinking it. You’re making sure your upgrade belongs in your system, fits cleanly, and works from the initial startup without stressful surprises.
How Much SSD Storage Do You Need?
Now that you know which SSD type fits your laptop, you need to choose a capacity that matches how you actually use it.
Since you mostly browse, stream, and handle school or office files, you likely won’t need as much space as someone who stores games, videos, or large creative projects.
Picking the right size now helps you avoid wasted money, cramped storage, and the stress of upgrading again too soon.
Choosing The Right Capacity
Because SSD size affects both price and daily comfort, you should choose a capacity that fits how you actually use your laptop, not just what sounds impressive. A smart upgrade feels good because it supports your routine and respects your budget planning. Whenever you pick thoughtfully, you join the crowd that buys once and buys well.
For many people, 500GB feels balanced, while 1TB gives more breathing room without feeling excessive. Should you keep your laptop for years, consider future expansion so you won’t feel boxed in too soon. Also, leave free space so your system stays responsive and updates install smoothly. Bigger isn’t always better, but too small can feel frustrating fast. The right capacity gives you confidence every time you save files, install apps, and settle into your digital space each day.
Matching Storage To Use
While bigger storage can feel safer, the right SSD size really depends on how you use your laptop each day. If you mostly browse, stream, and save school or work files, 256GB or 512GB often feels just right. If you’re part of a gaming, editing, or creative crowd, you’ll likely want 1TB or more so your laptop keeps up with you.
- Choose 256GB for light use and cloud-first habits.
- Pick 512GB for everyday balance, apps, photos, and offline files.
- Go with 1TB or higher for games, videos, design work, and larger projects.
Good drive selection starts with honest habits. Smart capacity planning means leaving room for updates, future files, and the space your system needs to stay fast.
That way, your upgrade fits your life, not just today’s storage needs.
What Tools Do You Need for the Upgrade?
A small toolkit makes this upgrade feel much less stressful, and you don’t need anything fancy to do it right. Start with a simple tool checklist: a small crosshead screwdriver, a plastic prying tool, a clean tray for screws, and good lighting. These basics help you open the case, keep parts organized, and avoid slips.
Just as vital, bring basic safety gear into your routine. You should unplug the laptop, remove or disable the battery, and ground yourself by touching bare metal before you reach inside. That quick step helps protect delicate parts from static.
In case your laptop uses a 2.5-inch SATA drive, keep a USB-to-SATA adapter nearby for setup tasks. With the right tools beside you, the whole job feels calmer, safer, and more doable together.
How Do You Back Up Before a Laptop SSD Upgrade?
Before you remove your old SSD, you should choose a backup method that fits your setup, whether that means creating a full image or cloning the drive with software like Acronis True Image.
Then you need to verify the backup works, because a backup you can’t restore won’t protect you should something go wrong.
Taking a few extra minutes here gives you real peace of mind and helps you start the upgrade with confidence.
Choose Backup Method
How should you back up your laptop before an SSD upgrade? You’ve got a few solid paths, and choosing the right one helps you feel ready, not stressed. Start by considering how much you want to save, how fast you need it, and what tools you already have nearby.
- Use cloud backup options if you want easy access, automatic syncing, and protection even in case your laptop has a bad day.
- Pick an external drive backup once you want full control, faster large-file transfers, and a simple way to keep everything close.
- Clone your current drive with imaging software as you want your new SSD to feel familiar from the opening boot.
If you’re unsure, combine methods. That extra layer can give you peace of mind and help you feel like you’re doing this right.
Verify Backup Integrity
Once you’ve chosen a backup method, take a few minutes to prove it worked, because a backup only helps whenever you can actually use it whenever the old drive is out. Open a few files, confirm folders match, and run checksum verification whenever your software offers it. Then do restore testing with one small folder to make sure recovery feels smooth, not scary. That quick check helps you stay calm and connected to the process.
| Check | Feeling |
|---|---|
| Files open | Relief |
| Photos match | Comfort |
| Checksums pass | Confidence |
| Test restore works | Trust |
| Backup drive seen | Belonging |
Whenever anything fails, fix it now while your laptop still runs. You’re not being overly careful. You’re protecting your place in your digital world, with your memories, work, and routines safely beside you each day.
Should You Clone the SSD or Reinstall Windows?
Upon upgrading a laptop SSD, one big choice comes up right away: should you clone your old drive or reinstall Windows from scratch? You’re not alone here, and both paths can work well depending on what your laptop needs most.
- Clone the SSD when you want a fast system migration strategy. You keep your apps, files, settings, and familiar setup.
- Reinstall Windows when your laptop feels cluttered, slow, or buggy. The clean installation benefits include better performance, fewer junk files, and a fresh start.
- Choose based on comfort. If you want less setup work, cloning feels easier. If you want a tidy system you can truly trust, reinstalling can feel more rewarding.
Either way, you’re making a smart move, and your upgraded laptop can feel like part of your daily rhythm again.
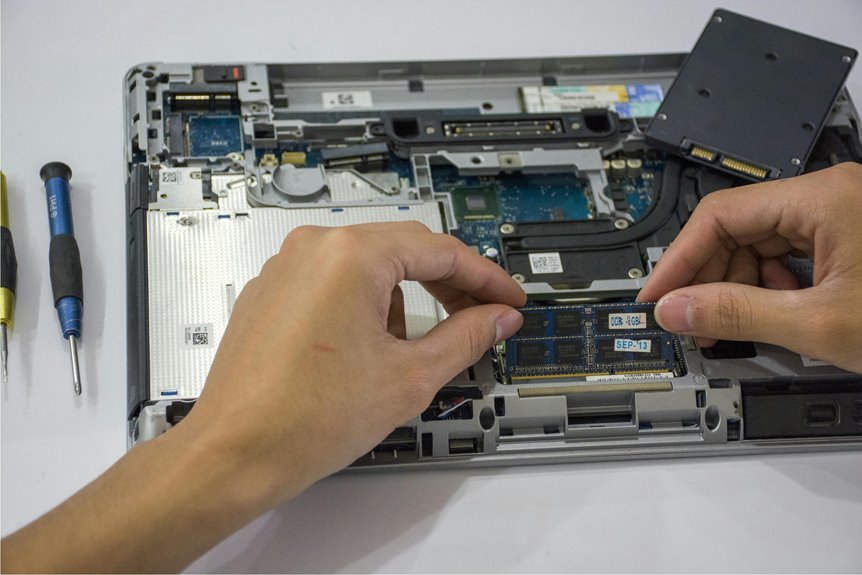
How Do You Install the New Laptop SSD?
The actual install usually takes just a few careful steps, and that’s good news because this part feels easier than most people expect. You’ll insert the new drive at a slight angle, then press it in with steady pressure until it seats fully. Good SSD installation alignment matters here, so match the notch, keep the drive level, and don’t force anything.
Next, secure the SSD with its screw or clip.
Should you be installing a 2.5-inch SATA drive, reconnect the SATA and power connectors gently and evenly.
Before closing the case, check that the drive isn’t touching the panel or frame.
Then reattach the cover, tighten the screws, and power on.
After that, open BIOS to confirm the laptop sees the drive, and do post install thermal checks during initial use.
How Do You Move Windows to the New SSD?
Getting the new SSD physically installed is only half the job. Now you need to bring Windows over so your laptop still feels like yours. Most people use cloning software for Windows migration, which copies your system, apps, settings, and files onto the new SSD.
- Connect the old drive externally, then run trusted cloning software.
- Copy all required partitions, not just the C: drive, so Windows can start correctly.
- After cloning, check BIOS/UEFI boot order and keep a recovery USB nearby.
If the cloned drive won’t start, don’t panic. You’re not stuck. Startup tools can often fix missing boot files, and bootloader repair usually solves common launch problems. Should you prefer, you can also restore a full system image instead of cloning. Either way, you’re keeping your digital home together.
What Happens on the First Boot?
After the install, your initial boot is the moment of truth, and it usually tells you right away whether the SSD is seated correctly and ready to work. You press the power button, listen for the usual startup sounds, and watch the screen for normal boot sequence behavior. If the laptop pauses longer than before, don’t panic. A brief BIOS recognition delay can happen while the system notices the new hardware.
From there, you might see the maker logo, a loading screen, or a setup message should the drive be fresh. If you cloned your old drive, your laptop might feel familiar almost immediately, which is a great relief. If it restarts once, that’s often part of settling in. You aren’t alone here. This initial boot is simply your laptop getting comfortable with its new heart.
How Do You Confirm the SSD Works?
How do you know the new SSD is truly working? You check a few clear signs, and each one helps you feel confident you did it right. First, confirm bios recognition in BIOS or UEFI. Whenever your laptop lists the SSD with the right model and size, that’s a strong start.
Then move into the system and look a little deeper:
- Open Disk Management or storage settings and confirm the drive appears with the correct capacity.
- Boot your usual files and apps to see that everything loads smoothly and feels quick.
- Run the maker’s utility or a trusted diagnostic tool to review drive health, firmware, and basic status.
When those checks line up, you’re not guessing anymore. You’re part of the group that knows their upgrade is solid and ready for everyday use.
What Problems Can Happen After Upgrading?
Even when the new SSD shows up in BIOS and the system boots, a few problems can still pop up during the initial days of use.
You might notice slow startups, missing files, app crashes, or random freezes. In case you cloned your old drive, data recovery issues can appear once partitions copy poorly or concealed system files don’t transfer right.
You could also hit activation errors, boot loops, or a drive that reports the wrong capacity in Windows. In some laptops, loose seating causes disconnects after movement or heat builds up and performance drops.
Then there’s software trouble. Firmware update failures can block fixes that improve stability, and outdated drivers can make the whole system feel off.
In case this happens, don’t panic. You’re not alone, and these bumps are common while your upgraded setup settles in.
What Can You Do With the Old SSD?
While your new SSD takes over the hard work, your old SSD can still be very useful. You don’t have to toss it aside. Instead, you can keep it in your tech circle and give it a fresh role that fits your needs.
- Turn it into portable storage with a USB enclosure. That’s a simple way to repurpose old drive space for backups, photos, or school files.
- Keep it as an emergency clone of your system. Should your new drive fail, you’ll feel more prepared and less alone handling the mess.
- Sell, donate, or recycle it after you securely erase storage. That protects your privacy and lets someone else benefit too.
Should the drive still work well, you’re not just saving money. You’re making smart use of something worthwhile.
Frequently Asked Questions
Will Upgrading the SSD Void the Laptop Warranty?
Replacing the SSD does not always cancel the warranty, but the answer depends on the warranty terms and the manufacturer’s policy. Read the warranty details before opening the laptop. Knowing the rules can help you protect both your device and your home.
How Long Does a Typical Laptop SSD Upgrade Take?
A laptop SSD upgrade usually takes 30 to 60 minutes. The exact time depends on how easy your laptop is to open and whether you transfer data from the old drive. For most users, this is a practical estimate.
Can an SSD Upgrade Improve Laptop Battery Life?
Yes, upgrading to an SSD can help extend your laptop’s battery life by reducing power use compared to a traditional hard drive. It can also improve speed and responsiveness, which may help your laptop complete tasks more efficiently.
Is Professional Installation Worth It for an SSD Upgrade?
Yes, it is worth it if you want expert installation, better protection for your data, and confidence that the upgrade is done correctly. If you are comfortable using tools and following instructions, you can also handle the installation yourself.
Can You Upgrade the SSD on an Ultrabook or Sealed Laptop?
Some ultrabooks and sealed laptops allow SSD replacement, but the options depend on the exact model and internal design. Check the service manual before buying parts, because many systems use soldered storage that cannot be removed or upgraded.