A high CPU temperature can slow your computer, trigger loud fans, and cause random shutdowns. Most heat problems come from dust, poor airflow, heavy workloads, or old thermal paste. A safe fix usually starts with checking your CPU temperature and cleaning up anything blocking cooling. Once you spot the cause, lowering heat levels is often simple and quick.
What CPU Temperature Is Too High?
While every CPU runs warm, a temperature becomes too high as soon as it stays hot enough to hurt performance, trigger throttling, or shorten the life of the chip. For most people, safe cpu ranges mean about 40 to 70°C during light to normal use, and roughly 70 to 85°C under heavier loads.
Above that, you should pay attention. Many CPUs can touch 90°C briefly, but provided yours stays there, it’s running too hot for comfort. That’s at which point your system might slow down to protect itself, and nobody wants their trusted setup to feel left out of the team.
Near 95 to 105°C, many chips approach thermal shutdown thresholds, where the system cuts power to prevent damage. Different models vary, so your CPU’s design always sets the real limit.
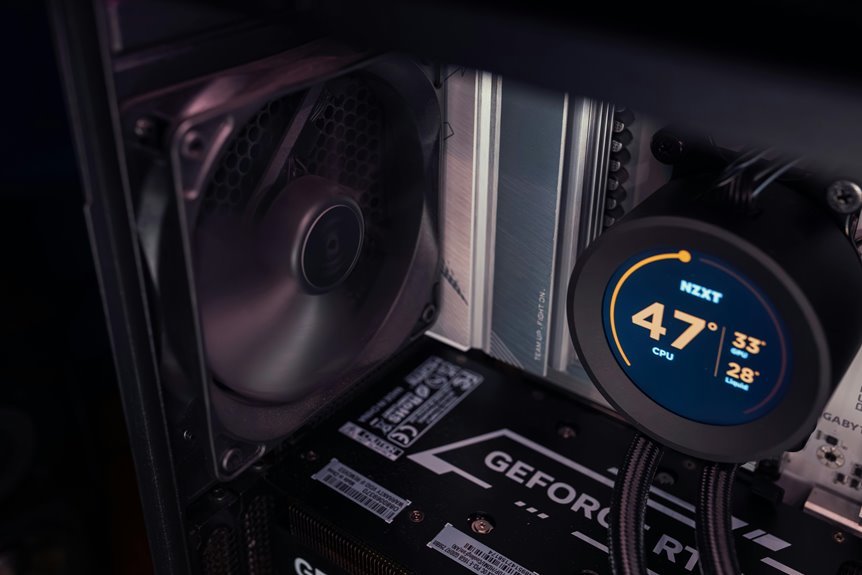
How to Check CPU Temperature Correctly
Being aware of what counts as too hot is only half the job. You also need to measure your CPU the right way, so you can trust what you see. Start with reliable temperature monitoring software or your BIOS, then compare idle and under-load readings. That gives you a fuller view of daily heat levels.
Next, check more than once. A single number can mislead you, especially when background tasks briefly raise heat. Let your system sit still for idle results, then run a trusted workload for several minutes.
Also, keep sensor accuracy in mind. Different apps might report slightly different values, so use one solid tool consistently. In case you use a laptop or desktop, you’re part of the same learning curve here, and you’ve absolutely got this with a little patience too.
Signs Your CPU Is Overheating
Should your PC suddenly feel slow during simple tasks or games, your CPU could be getting too hot and cutting back its speed to protect itself.
You could also notice random shutdowns or restarts, especially whenever your system is under load.
These warning signs can feel frustrating, but they often point to overheating before bigger damage happens.
Sudden Performance Drops
Because your CPU protects itself from heat, one of the initial warning signs you’ll notice is a sudden drop in speed right when you need performance most. You could open a game, start editing, or join a call, then feel everything slow down. That’s your system trying to stay safe, not failing you.
As temperatures rise, thermal throttling effects reduce clock speeds to cut heat fast. In everyday use, that can feel like lag, stutter, longer load times, and delayed clicks. You could also notice apps that usually run smoothly suddenly struggle together.
This shift often points to performance bottleneck causes linked to poor cooling, dust, aging thermal paste, or hot room conditions. If you’ve felt your trusted setup acting unlike itself, you’re not imagining it. Your CPU is asking for help.
Frequent System Shutdowns
When CPU heat climbs too high, your system might shut down without warning to protect itself from serious damage. That sudden cutoff isn’t random, and you’re not by yourself whenever it feels frustrating or even a little scary. Your computer is trying to save its processor before heat causes lasting harm.
Whenever these shutdowns keep happening, you might also notice operating system crashes, loud fans, or a very hot case. Start with checking airflow, removing dust, and keeping your device away from heaters or direct sun. Should you be on a laptop, place it on a hard surface so vents can breathe. Fresh thermal paste can help, and a stronger cooler could be the fix you need. Also, use power surge protection, because heat stress and unstable power together can make shutdown problems worse over time.
Why CPU Temperatures Get Too High
Although a CPU is built to run hot, its temperature climbs too high when heat builds up faster than your cooling system can remove it. In your system, several heat sources can push things past safe limits. Heavy workloads, increased clock speeds, aging thermal paste, and dust on fans or heatsinks all trap warmth where it shouldn’t stay.
At the same time, ambient conditions around your device matter more than many people realize. Should your room be hot, your PC starts warmer and has less headroom to cool down. Direct sun, nearby heaters, soft laptop surfaces, or cramped spaces can all raise temperatures further.
That means you’re not doing anything wrong. You’re handling a system that reacts to both internal strain and the environment around the setup you rely on daily.
Improve Case Airflow First
Before you spend money on a new cooler, start by improving case airflow, since trapped heat inside the case can make even a good CPU cooler struggle. Your system works best when cool air enters from the front or bottom and warm air exits through the rear or top.
That means you should create a clear airflow path. Check that cables aren’t hanging in front of fans or blocking open space around the CPU area.
If your case supports more fans, use them to strengthen case ventilation and help hot air leave faster. Also, make sure intake and exhaust fans face the right direction, so air moves together instead of fighting itself.
When your case breathes well, every part of your build gets support. That’s a simple fix your whole setup will feel, and you’ll feel more confident too.
Clean Dust From Fans and Vents
Good airflow only helps provided air can actually move, and dust often blocks that path little by little until your CPU starts running hotter than it should. If you want your system to feel dependable again, start with a careful dust removal routine using compressed air on vents, heatsinks, and fan blades.
Before you clean, shut the computer down, unplug it, and move it to a well-ventilated spot. Hold the fan blades still while you spray, so you don’t stress the bearings. Then clear intake vents, exhaust openings, and tight corners where buildup hides. For laptops, focus on exterior vents and openings without forcing anything inside.
This simple habit supports vent blockage prevention, helps heat escape, and keeps your PC feeling like part of your everyday team, not a noisy little furnace anymore.
Check for Failing CPU and Case Fans
Even after you clear out dust, a weak or failing fan can still trap heat inside your system and push CPU temperatures higher than they should be. That means it’s time to check whether your CPU cooler and case fans still spin strongly and respond correctly under load.
- Listen for grinding, rattling, or stop-start spinning
- Watch for slow startup or wobbling blades
- Use BIOS or monitoring apps for fan failure diagnosis
- Confirm reported speeds with rpm sensor testing
These checks help you spot trouble before heat builds up again. If one fan runs slower than expected, your airflow team breaks down, and your whole system feels it. You don’t have to guess. Compare fan speeds, inspect cable connections, and make sure each fan ramps up when temperatures rise. Small checks like these help you protect your PC with confidence.
Replace Old Thermal Paste
If your fans are working and dust isn’t the problem, old thermal paste is often the next thing to check. Over time, thermal paste aging causes the material to dry out, crack, and stop moving heat well from your CPU to the cooler. That leaves your system running hotter than it should, even when everything else seems fine.
The good news is that you can fix this and get your PC back in the group of cool, steady performers.
First, remove the old paste carefully with isopropyl alcohol and a lint-free cloth. Then apply fresh paste with care. Different paste application methods work, but the goal stays the same: use a small, clean amount that spreads evenly under pressure. Too much or too little can hurt results and raise temperatures again.
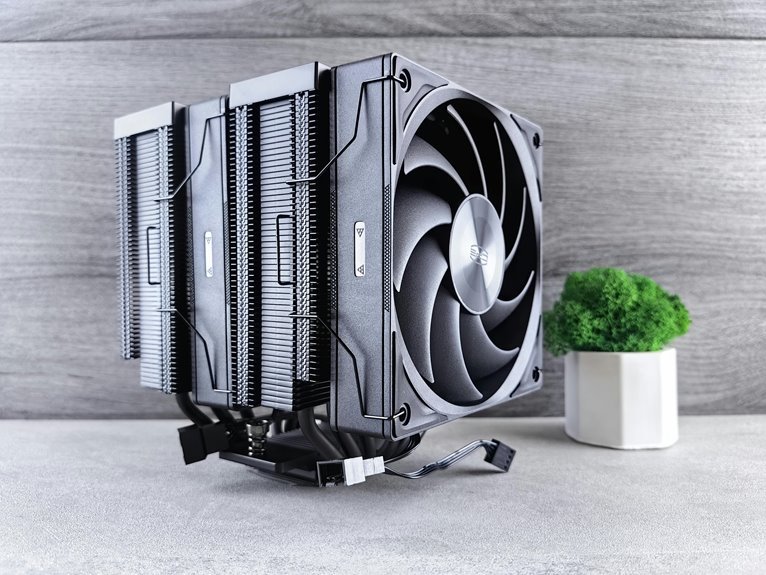
Upgrade to a Better CPU Cooler
Fresh thermal paste can help a lot, but sometimes the cooler itself just can’t keep up with the heat your CPU makes.
Whenever that happens, upgrading your CPU cooler can bring your whole build back into a safer, calmer place. You deserve a system that feels reliable, not stressed.
- Choose an aftermarket air cooler whenever you want strong cooling and simple installation.
- Pick an AIO liquid cooler for hotter chips, overclocked systems, and cleaner case space.
- Check cooler compatibility with your socket, case height, and RAM clearance before buying.
- Match TDP support and radiator sizing to your CPU and case so heat moves out efficiently.
Whenever your stock cooler struggles, a better unit can lower temperatures fast. With the right fit, your PC feels like part of the team again.
Adjust Fan Curves for Better Cooling
Once you’ve installed a capable cooler, the next step is telling your fans when to work harder. That’s where fan curve tuning helps your system feel truly dialed in. You can set custom speeds in BIOS, UEFI, or motherboard software, so fans stay quiet at low temps and ramp up before heat gets out of hand.
For better control, build temperature based fan profiles that match how you actually use your PC. Start with gentle increases at lighter loads, then create steeper jumps once your CPU reaches warmer ranges. This keeps cooling responsive without making your setup sound like it’s preparing for liftoff.
When your motherboard allows it, link case fans to CPU temperature too. With a little testing, you’ll find a balance that keeps temps lower and makes your whole rig feel like home.
Cut Background Apps to Lower CPU Temps
Fan tuning helps move heat out faster, but it also helps to stop extra heat from building up in the initial place. One easy win is cutting unnecessary background tasks that keep your CPU busy whenever you aren’t even using them.
You aren’t alone here. Every system collects extra apps over time.
- Open Task Manager and sort through CPU usage to spot heavy apps fast.
- Close launchers, chat tools, and sync apps you don’t need right now.
- Review startup services and disable the ones your daily routine doesn’t need.
- Uninstall programs that keep checking for updates in the background.
This step works well with better fan control because less workload means less heat to remove. Your PC feels calmer, quieter, and more like part of a setup you can trust every day.
Use Undervolting to Reduce Heat
If your CPU still runs hot after trimming background apps, undervolting can help by lowering the voltage your processor uses without forcing a big drop in everyday speed. Think of it as smart voltage tuning, not risky tinkering. You’re simply asking your chip to do the same work with less electrical pressure, which often improves power efficiency and cuts heat.
Start slowly in your BIOS or a trusted tuning utility, then lower voltage in small steps. After each change, test stability with everyday tasks and a stress tool.
If you see crashes, freezes, or reboots, raise it slightly and try again. That careful approach helps you find a safe balance your system can handle. You’re not chasing perfection here. You’re joining countless PC users who’ve cooled things down with patience and a little confidence.
When High CPU Temps Signal Hardware Trouble
Even after you’ve lowered voltage and trimmed heat where you can, high CPU temperatures can still point to a deeper hardware problem. If temps stay high, you’re not alone, and your system may be showing hardware failure signs instead of normal heat.
- A failing pump or fan can leave your cooler running, but not actually moving enough heat.
- Dried thermal paste can break contact between the CPU and cooler, causing sudden spikes under light use.
- A warped heatsink, bad sensor, or loose mounting pressure can create diagnostic warning indicators you shouldn’t ignore.
- Random shutdowns, throttling, or burning smells often mean a part is struggling, not just running hot.
At this stage, you’re not overreacting by checking parts closely. You’re protecting your setup and joining smart users who catch problems beforehand.
How to Keep CPU Temps Down Long Term
To keep CPU temps down long term, you need strong case airflow, clean cooling hardware, and smart power settings working together.
You can help your system run cooler by clearing dust, checking fans, replacing worn thermal paste, and making sure air moves freely through the case.
Should heat still climbs, you can lower the maximum processor state or ease back performance settings so your CPU doesn’t work harder than it needs to.
Improve Case Airflow
As your case moves air well, your CPU has a much easier time getting rid of heat and staying stable day after day. You want cool air to enter, pass cleanly over hot parts, and leave fast. That airflow path matters more than many people believe, and smart vent placement helps your whole build work together like a team.
- Place intake fans at the front or bottom to pull in cooler air.
- Use rear or top exhaust fans to push rising heat out quickly.
- Keep cables tied back so they don’t block the airflow path.
- Leave space around vents so your PC can breathe freely.
As you improve airflow, you create a more comfortable home for every part inside. That’s a simple win you can feel good about, and your system will thank you with steadier temperatures too.
Maintain Cooling Hardware
Regularly checking your cooling hardware keeps small heat problems from turning into stressful overheating later. You protect your system best whenever you clean dust from fans, vents, and heatsinks before buildup chokes airflow. You should also watch for noisy fans, loose mounts, and blocked vents, because those warning signs often show trouble sooner.
Just as airflow matters, contact and surroundings matter too. Should your CPU still runs hot, replace old thermal paste so heat moves cleanly into the cooler. Apply it carefully, since too much or too little can hurt performance.
For laptops, smart cooling pad placement helps vents breathe instead of recycling warm air. You also benefit from ambient temperature control since keeping your device away from sun, heaters, and cramped spaces. That steady care helps your setup stay reliable and ready.
Optimize Power Settings
Even though your cooler works well, your CPU can still run hotter than it needs to because your power settings keep pushing it to full speed all day. Smart power plan tweaks help your system stay cooler without making it feel slow, so your setup works with you, not against you.
- Open Power Options and choose balanced settings.
- Lower maximum processor state to 99% first.
- Should temps stay high, try processor state limits like 98% or 97%.
- Turn off Turbo if short speed spikes cause extra heat.
These changes cut unnecessary heat by stopping constant top clock speeds. You still get smooth everyday performance, and your PC feels more stable during long sessions.
Should you’re trying to build healthy habits for your system, this is one of the easiest wins your whole setup will appreciate over time.
Frequently Asked Questions
Can Room Temperature Alone Raise CPU Temperatures Significantly?
Yes, room temperature by itself can raise CPU temperatures quite a bit, especially when the weather gets warmer. Higher ambient heat, weak airflow in the room, trapped warmth, direct sunlight, or nearby heaters can all make your system run hotter.
Does Disabling Turbo Boost Help Lower CPU Heat?
Yes. Disabling Turbo Boost lowers CPU heat because it stops short bursts to higher clock speeds. The change is usually noticeable right away. Power limit tuning can also reduce temperatures while keeping most everyday performance intact.
Should I Reduce Maximum Processor State to Cool My CPU?
Set maximum processor state to 99% if you want a quick way to lower CPU temperatures. This usually disables turbo boost, which reduces heat while keeping everyday performance responsive. You can also improve temperatures by checking power limits and closing unnecessary background processes.
How Often Should Thermal Paste Be Replaced?
Replace thermal paste every 2 to 5 years. If temperatures start climbing, or the paste looks dry or cracked, it is time for a fresh application. Checking thermal paste lifespan and these warning signs helps keep your system running at safe temperatures.
Are Liquid Coolers Better Than Air Coolers for Overheating?
Liquid coolers usually reduce overheating more effectively, especially when paired with a powerful pump and a large radiator. Air coolers still offer solid performance at a lower cost and with simpler installation, so the right choice depends on your hardware and cooling needs.